XQ Dashboard
Tutorials
XQ Dashboard is the heart of XQ
Dashboard enables groups to be productive and secure from anywhere. All your encrypted communications are easily accessible, keeping you aware and compliant with minimal effort.
Introduction to XQ’s Dashboard
Workspace is the heart of XQ, where groups stay safe and secure. Workspace enables groups to be productive and secure from anywhere. All your encrypted communications are easily accessible, keeping you aware and compliant with minimal effort. Workspaces’ access controls, and key management that let you scale data-centric protection across your sensitive workflows on everything from email to smart cities. Using Workspace helps keep your data safe. Workspace is a simple tool allowing a team to manage all its XQ encrypted communications and XQ API usage. Workspace doesn’t hold your data, but it tracks what happens to your data out in the world and lets you know who, what and where your data is read. When your teammate, employee, or customer sends and receives an XQ email, chat, file or form submission from one of our products it is tracked in the activity and communications sections for easy security and compliance. Now you can communicate safely and securely with customers and coworkers while monitoring all activities within your organization.
How to login to xQ’s Dashboard
Start by visiting www.xqmsg.com and clicking the launch XQ button or by clicking on the Dashboard icon in one of our communication products. You will be able to access your account by using google single sign on or submitting your email address and receiving a magic link directly in order to access your account. After entering your email a magic link will be sent to you that you will click on to enter the dashboard. You can now access the XQ Dashboard. XQ's dashboard is the heart of XQ, where groups stay safe and secure.
Monitor overview
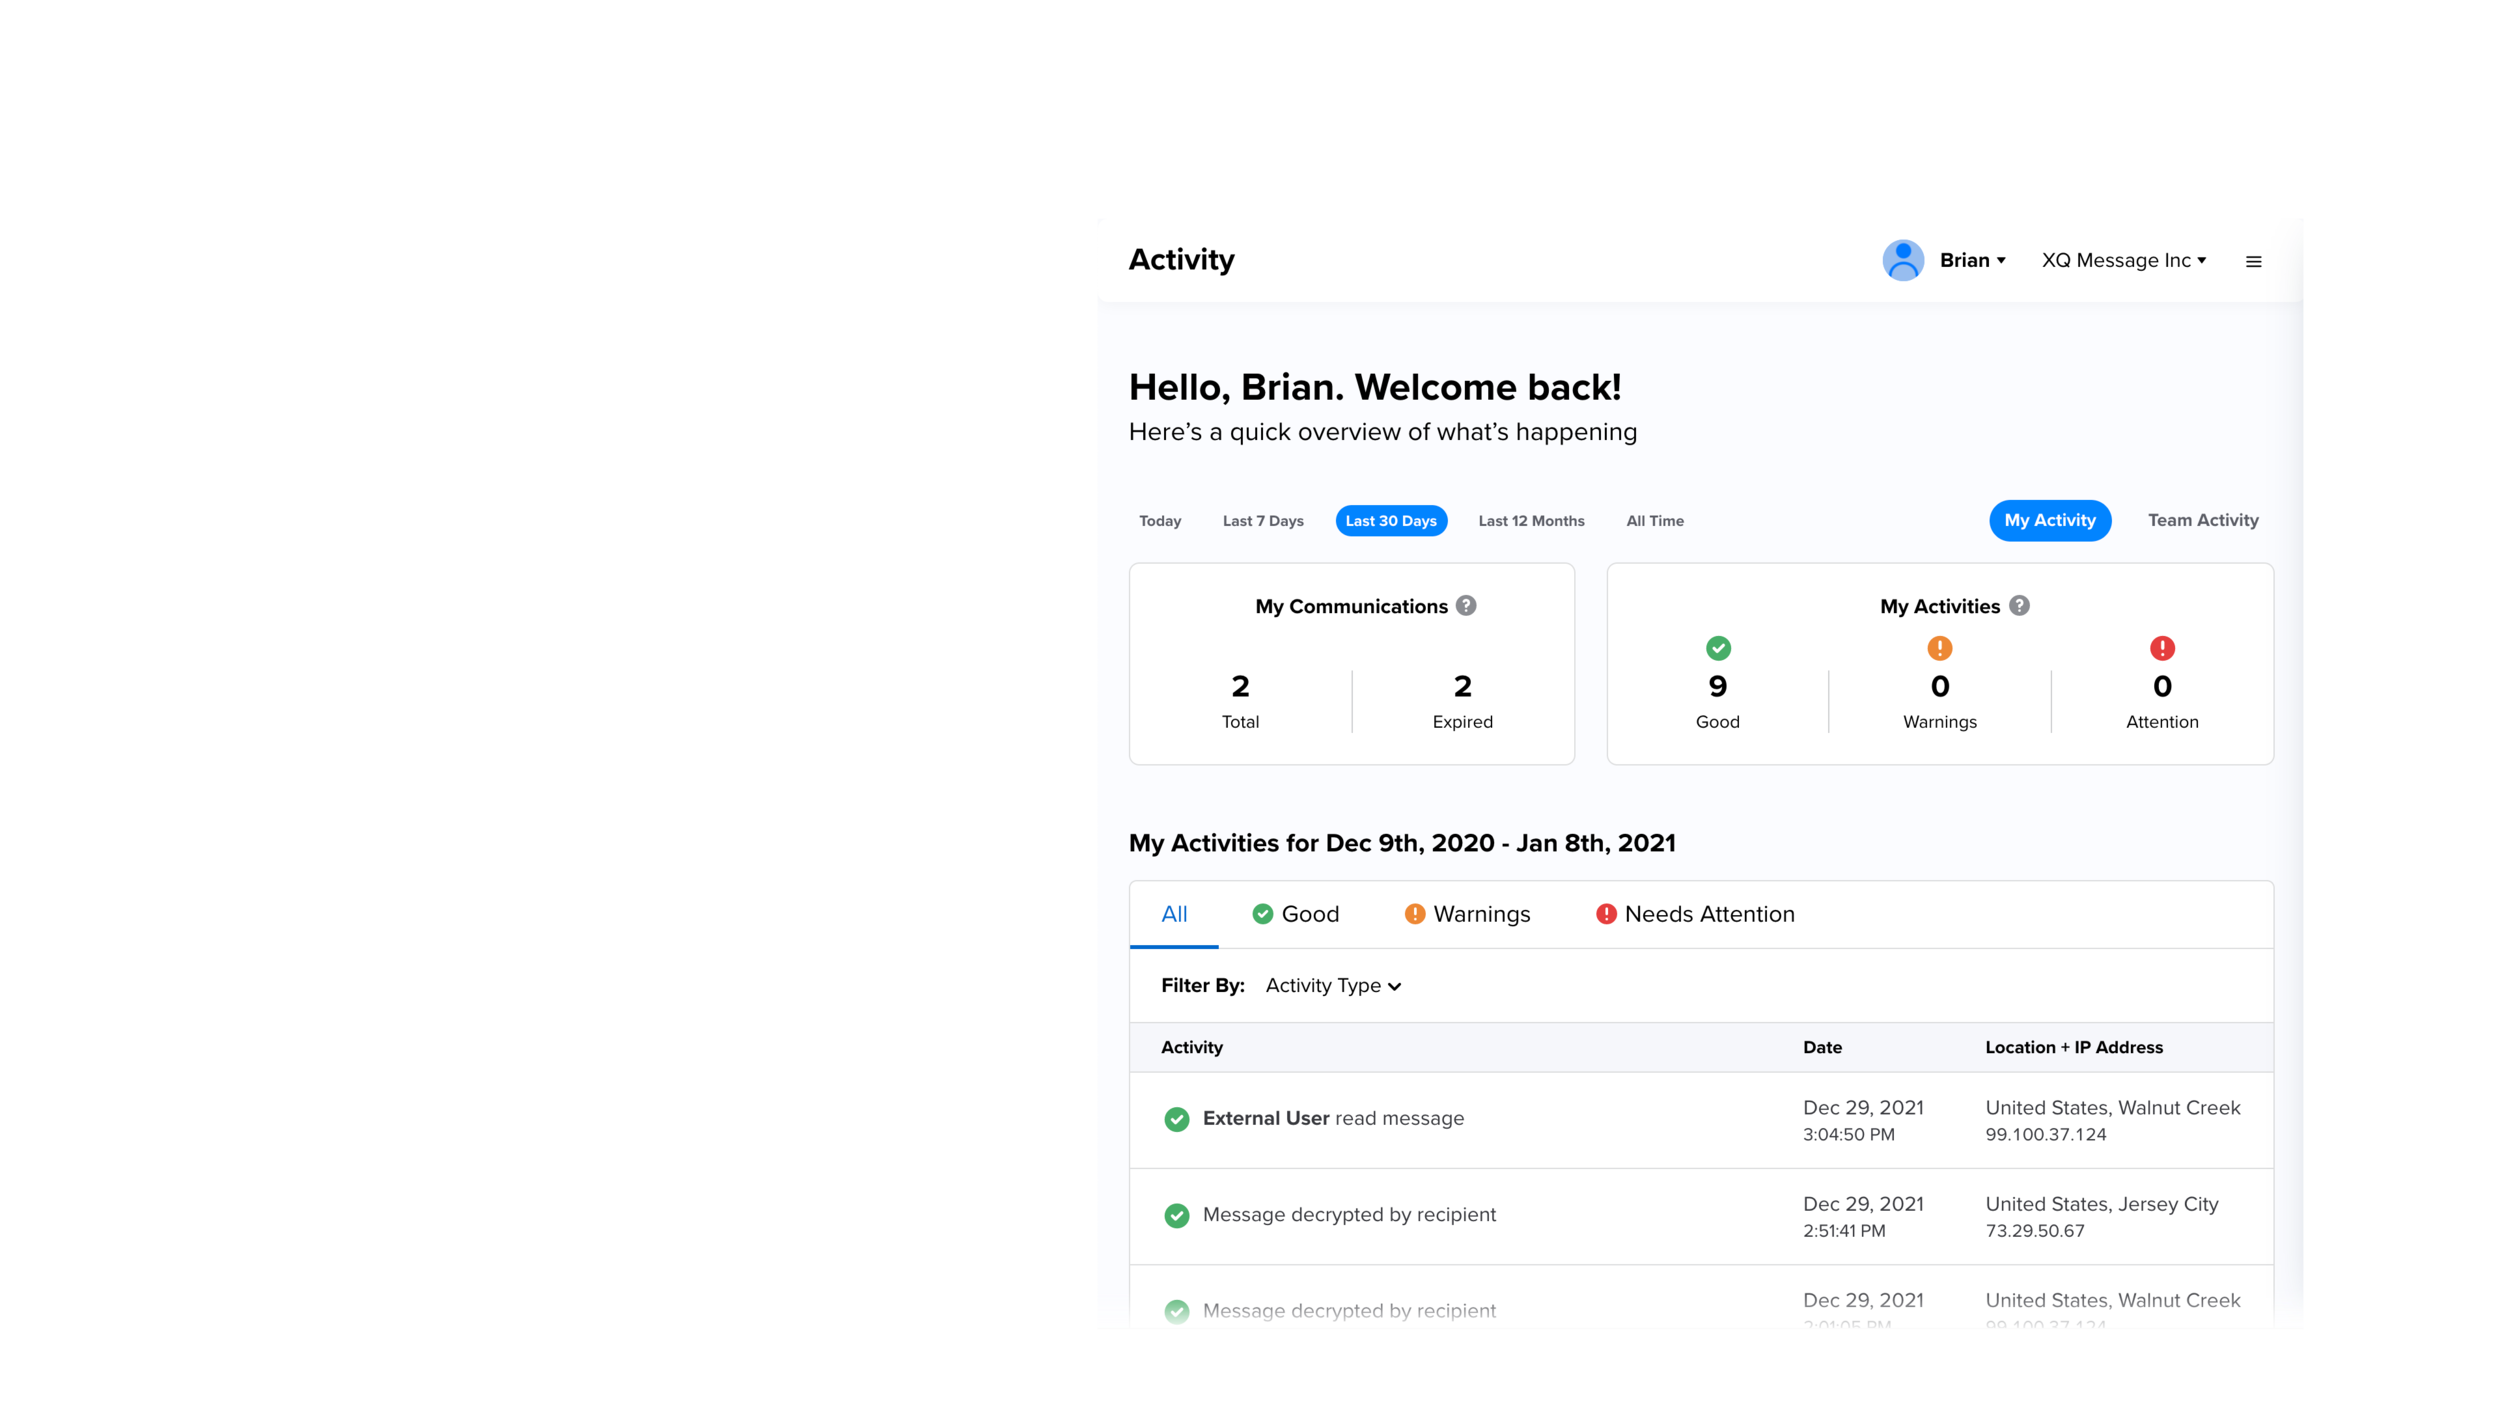
The purpose of the monitor section is to allow you to monitor all of you and your team’s activities. Under the monitor section you will be able to access all of the activities you and your team have done, all of the communications done by you and your team as well as who is provisioned as a team member. The monitor section is the management tool for the XQ suite. It allows the manager to create and provision team members, monitor threats in real-time, and monitor team encryption activity. By clicking into the messages you can see the layer down functionality. Within the layers you can see all the events for a message, any warnings, who has access, and how to revoke access. There are also different color levels to indicate any threats or potential threats within communication. Now you can monitor and communicate safely and securely with your customers and team members.
How to monitor communications
In order to view all of the communications, click on the communications tab on the left hand side of the window. Here you will be able to filter for communications by you or your team. Simply click on “team communication” or “my communication” to switch between accounts. Communications can be filtered by dates. Team Communications shows the status of communications for all invited and verified team members in your workspace. You can access and manage your team through the menu bar on the left.
In order to sort communications based on your selected time range, Simply click “today” “last 7 days” “last 30 days” “last 12 months” or “all time”. You can filter communications further by selecting the communications status. This will be either “good”, “needs attention” or “warnings”. You can also search for a specific file name or user name by typing in your query in the search bar. Filter your search further by highlighting the communication type you are searching for, this can be a file, an email or other. You can filter by the status of your communications by clicking if the communication is available, revoked or expired. If you know the recipient of the communication you are looking for, you can further filter by the recipient's email address.
In order to grant or revoke access of a specific communication simply click on the communication which will open the specified communication up in a window. Here you can revoke all access to this communication (email or file) or grant additional access privileges by simply clicking revoke access (a window will appear requesting confirmation) or clicking grant access where you will be prompted to provide the email address of whomever you would like to grant additional access to.
How to Monitor Activity
Once logged in you can navigate to the activity section by clicking on the left hand navigation bar. Activity is a running log of all the security events for your communications. By selecting any of the activities you can see a complete history of the events for any transmission.
Here you can select a specific date range to view analytics which provides a brief overview of key engagement KPIs. You can filter to view analytics based on your personal activity or your team's activity. Activities can be filtered by those requiring immediate attention, warnings and those that have been successfully completed so you can easily and quickly identify threats.
How to Manage Teams
Under Team, you will be able to review who is currently provisioned as a team member and what each team member's role is. You will also be able to add new team members here.
In order to add new members, you will need to click “add new” on the top left corner. This will open a new window where you will be prompted to add your new team member and all of their information. You can define the user by several roles depending on if they are an employee (you can choose if they have administrative privileges which allows users to see their team's communications or can leave them as a basic user), customer or vendor. You will be able to add whether you are notified of alerts and notifications, alerts only or you can select none if you do not want to be notified of any alerts or notifications. Once you have filled out all of the required fields, click “create contact” to add your new user. Now you can work remotely and collaborate safely with coworkers and customers.
How to add multiple team members
Having a verified team adds a layer of security by authenticating the identity of the communicating parties. It also helps identify external communications of sensitive material. You can be ensured that all contacts will be able to access and send information securely and it is recorded safely within the dashboard.
To get started navigate to the team tab in the XQ Dashboard. If you would like to bulk upload contacts, click “import” besides teams. Here you will be able to bulk upload contacts in various formats. Click “get templates” in order to receive the JSON and CSV file templates required to bulk upload contacts. Open the CSV template from your local file system and input your team members First Name, Last Name, Role, Notifications, Title, Email, and Phone. The role indicates the new user role in the company and must be Admin, User, Vendor, or Customer. Once you have populated the spreadsheet simply drag and drop it in the drop-zone followed by clicking Import. Adding team members allows you to verify all recipients of your communications. Now you can communicate safely and securely with customers and coworkers.
how to send an encrypted message
After logging in, on the left hand side, select encrypt your message. Fill out the subject line and type your message and then click next. Enter the email address of the recipient and it is optional to select whether the recipient must require user authentication to read the message, click next. Set an expiration date on the message. Once the time has elapsed the message will no longer be available for reading, click next. You can copy a link to the encrypted message, sending using your email, or send it from the XQ dashboard. We built the dashboard to include real-time threat assessment and one of the most secure email tracking tools on the market. When you encrypt a message with XQ, you also get the added benefit of a spoof-proof email tracking system. Using the XQ dashboard, you can track in real-time whether an email was received, read, and any attempts to decrypt the message. If you see an alert about an attempt to decrypt by someone other than the intended recipient, you can immediately revoke the email.
how to encrypt a file
XQ provides zero trust encryption so that you never have to worry about your data being leaked and that your file reaches the recipient securely. After logging in, on the left hand side select encrypt file.
Optionally, Enter the recipient's email address if you would like to require user authentication to read the file. Click next. Select a file expiration date, once the time has elapsed, the file will no longer be available. Click next. Drag and drop your file or click browse to attach a file. Then click download encrypted file. Your file is now encrypted and can be sent to a recipient or saved locally. With the encrypting tool, you can add an extra layer of protection to your data.
Now you can communicate safely and securely with customers and coworkers, sending files freely back and forth over public channels.
how to Decrypt a file
XQ provides zero trust encryption so that you never have to worry about your data being leaked and that your file reaches the recipient securely. After logging in, on the left hand side select decrypt file. Drag and drop or browse for the file. You can only decrypt files with an .xqf extension by dragging them onto the container below. Your file is decrypted locally and never leaves your device. Then click download the decrypted file. With the decrypting tool, now you can successfully read and process encrypted files safely.
Now you can communicate safely and securely with customers and coworkers, sending files freely back and forth over public channels.
how to use the audit tools
After logging in, on the left hand side you will see audit tools: export and unlock. Let’s review export first.
The purpose of export is to Export message encryption keys belonging to transmissions of your team. These can be used to restore messages, even after keys are no longer available online or have been revoked. You can select the days of availability, the user roles, which contacts, and the format of the key which is available in JSON and CSV. Click export keys and they are downloaded locally and can be used to unlock your workspace team’s encrypted communications.
In order to unlock your secured data With the exported keys , select the Unlock section from the left hand navigation bar. Drag and drop your keys into the appropriate area. Do the same with a zip of your encrypted files and messages. Optionally, enter filter terms to search for in the encrypted contents. Click Unlock Data to decrypt your messages.
Decrypted Files and messages are readable through the XQ online browser. Download all relevant messages.
Didn’t find what you are looking for?
Additional user guide documentation can be found at docs.xqmsg.com/knowledge